

Looking for a dessert that’s easy to make and an instant crowd-pleaser? Meet the Snickers Ice Cream Cake. It’s everything you love about the classic Snickers bar—creamy, crunchy, sweet, and salty—turned into a no-bake layered masterpiece. Perfect for birthdays, celebrations, or just because you want something indulgent. Bonus? You don’t even need to bake it.
Fun fact: Did you know Snickers was named after the Mars family’s horse back in 1930? Pretty quirky! And now, that iconic candy bar is the star of this dessert. Let’s dive into the details!

Overview at a Glance
- Active Time: 30 minutes
- Freezing Time: 3–6 hours (or overnight)
- Servings: About 12 slices (or more if sliced smaller)
- Skill Level: Super beginner-friendly
What You’ll Need:
- A 9×13-inch pan
- A hand mixer or stand mixer
- Microwave-safe bowls
- A spatula
- A sharp knife for chopping the candy
Good news? You can make this cake up to two days ahead of time. Just pop it in the freezer, and it’ll be ready to go when you need it!
Ingredients (and Simple Alternatives)
Here’s what you’ll need for this layered treat:
- 14 oz Hot Fudge Sauce – Just warm it slightly so it’s pourable.
- 24 Ice Cream Sandwiches – Let them soften a bit for easy layering.
- 16 oz Heavy Whipping Cream – Whip it for that light, fluffy texture.
- 1/3 Cup Powdered Sugar – Just enough to sweeten the whipped cream.
- 18 Fun-Size Snickers Bars – Chop them up into bite-sized pieces.
- 14 oz Caramel Topping – Adds that buttery sweetness.
- 1/2 Cup Roasted Salted Peanuts – A little crunch and salt for balance.
Swaps and Twists:
- Don’t like Snickers? Try Twix, Reese’s, or any candy bar you love.
- No time to whip cream? Use Cool Whip instead.
- Want a gluten-free version? Use gluten-free ice cream sandwiches.
Step-by-Step Instructions
Step 1: Start with the Base
Grab your 9×13-inch pan. Lay down 12 ice cream sandwiches in a single layer. If they don’t fit perfectly, trim a couple to fill the gaps.
Step 2: Add Hot Fudge
Microwave the hot fudge for about 15–20 seconds until it’s easy to pour but not too hot. Spread half to three-fourths of it over the ice cream sandwiches. Freeze for 15–30 minutes to let it firm up.
Step 3: Whip the Cream
Whip the heavy cream with a hand mixer until it starts to thicken. Add the powdered sugar gradually and beat until soft peaks form. Translation: The cream should hold its shape but still look smooth and silky. Divide into two portions.
Step 4: Build the Layers
Spread one half of the whipped cream over the chilled fudge layer. Pop the pan back in the freezer for another 15–20 minutes.
Meanwhile, chop up 12 fun-size Snickers bars. Save six more bars for garnishing later. Sprinkle the chopped Snickers evenly over the whipped cream layer.
Step 5: Keep Layering!
Place another layer of ice cream sandwiches on top of the Snickers. Drizzle caramel sauce (about three-fourths of it) across this layer. Spread the remaining whipped cream over that.
Step 6: Garnish & Freeze
Top your creation with the reserved Snickers pieces and a handful of roasted peanuts. For extra flair, drizzle both caramel and hot fudge over the top. Cover the pan tightly and freeze for at least 3–6 hours or, even better, overnight.
Pro Tips & Variations
Want to mix it up? Here are some fun ideas:
- Seasonal Spins: Add crushed peppermint candies for the holidays, or throw in fresh berries during summer.
- Fancier Touches: Drizzle melted dark chocolate on each slice before serving, or sprinkle edible gold flakes for a fancy vibe.
- Vegan-Friendly: Swap in non-dairy ice cream sandwiches, coconut whipped cream, and vegan caramel sauce.
How to Serve and Store
Serving:
Let the cake sit out for about 5 minutes before slicing—it’ll make cutting soooo much easier. Use a warm knife (dip it in hot water and dry it off) for clean slices. This cake is amazing on its own, but you can pair it with a scoop of your favorite ice cream if you’re feeling extra indulgent.
Storing Leftovers:
Got extras? Wrap individual slices tightly in plastic wrap to avoid freezer burn. Store in an airtight container in the freezer for up to a week.
Why You’ll Love This Cake
This Snickers Ice Cream Cake isn’t just a dessert—it’s a whole experience. Creamy ice cream, gooey caramel and fudge, salty peanuts, and chunks of Snickers in every bite. It’s ridiculously easy to make and guaranteed to impress whoever’s lucky enough to share it with you.
So go ahead, grab those ingredients, clear out some freezer space, and get ready to treat yourself!
PrintSnickers Ice Cream Cake
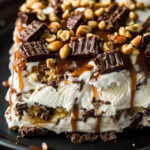
This Snickers Ice Cream Cake is a no-bake, crowd-pleasing dessert layered with creamy ice cream sandwiches, rich hot fudge, caramel sauce, whipped cream, crunchy peanuts, and chunks of Snickers bars. Perfect for celebrations or summer treats, this indulgent cake is easy to make and irresistibly delicious!
- Prep Time: 30 minutes
- Cook Time: No cooking required
- Total Time: 3–6 hours (including freezing)
- Yield: 12 slices 1x
- Category: Dessert
- Cuisine: American
Ingredients
- 14 oz hot fudge sauce (warmed for drizzling)
- 24 ice cream sandwiches (softened slightly)
- 16 oz heavy whipping cream (cold)
- 1/3 cup powdered sugar
- 18 fun-size Snickers bars (12 chopped for layers, 6 reserved for garnish)
- 14 oz caramel topping (warmed for drizzling)
- 1/2 cup roasted salted peanuts
Instructions
- Prepare the Base Layer:
Line a 9×13-inch pan with 12 ice cream sandwiches placed snugly together. Trim as needed to fit perfectly. - Add Hot Fudge Layer:
Microwave the hot fudge sauce for 15–20 seconds until pourable. Pour about 3/4 of the sauce over the ice cream sandwiches and spread evenly with a spatula. Freeze for 15–30 minutes to set. - Whip the Cream:
Using a hand mixer, whip cold heavy cream until thickened. Gradually add powdered sugar and beat until soft peaks form. Divide whipped cream into two equal portions. - First Layer of Whipped Cream:
Spread half of the whipped cream over the hardened fudge layer and freeze again for 15–20 minutes. - Add Snickers Layer:
Chop 12 Snickers bars into bite-sized pieces and evenly sprinkle them over the whipped cream layer. - Second Ice Cream Sandwich Layer:
Arrange the remaining 12 ice cream sandwiches on top of the Snickers layer to form a second base. - Caramel Layer:
Pour about 3/4 of the caramel topping over the ice cream sandwich layer, spreading evenly with a spatula. - Final Whipped Cream Layer:
Spread the remaining whipped cream over the caramel layer. Garnish with chopped peanuts and reserved Snickers pieces. - Drizzle and Freeze:
Microwave both caramel and hot fudge sauces for another 15–20 seconds to make them pourable again. Drizzle generously over the entire cake. Cover tightly and freeze for at least 3–6 hours or overnight until firm. - Serve and Enjoy:
Let the cake sit at room temperature for about 5 minutes before slicing with a warm knife.
Notes
Serving Suggestions:
- Serve chilled with extra caramel or hot fudge sauce on the side for drizzling.
- Pair with coffee or milk for a delightful treat.
Tips & Tricks:
- Use a warm knife (dip in hot water and wipe dry) to cut clean slices.
- Chill your mixing bowl and beaters before whipping cream for better results.
- Allow each layer to freeze briefly before adding the next to prevent mixing.
Storage:
- Store leftovers in an airtight container or wrap tightly in plastic wrap to prevent freezer burn.
- Keeps well in the freezer for up to one week.
Reheating:
This dessert is best served frozen; if it becomes too hard, let it sit at room temperature for a few minutes before serving.