

Hot summer days can be tough on our furry friends, right? They’re panting, seeking shade, and just trying to stay cool. That’s where Peanut Butter Dog Popsicles come in! These easy frozen treats are the perfect way to help your pup chill out. Made with simple ingredients like creamy peanut butter, plain yogurt, and a crunchy dog biscuit, they’re both tasty and healthy.
Think of these popsicles as the doggy version of an ice cream cone—only better, because you made them with love. Plus, they’re ridiculously easy to whip up. Ready to spoil your pup? Let’s get started!

What You Need to Know
Here’s a quick breakdown before we dive in:
- Prep Time: 15 minutes
- Freezing Time: 2 hours
- Total Time: About 2 hours 15 minutes
- Skill Level: Beginner (no cooking involved—just mix and freeze!)
- Servings: Around 14 popsicles (depending on your molds)
Make extra if you have more than one pup or just want to stock up. They stay fresh in the freezer for up to two months.
Ingredients
Here’s your simple shopping list:
- 1 cup plain yogurt (unsweetened, no xylitol—it’s toxic to dogs!)
- 1 cup creamy peanut butter (natural, no added sugar or salt)
- 14 dog biscuits (pick a size that works with your molds or tray)
Substitution Ideas:
- Yogurt: Go for lactose-free or coconut yogurt if your dog’s tummy is sensitive.
- Peanut Butter: Swap for pumpkin puree if your pup has a peanut allergy.
- Dog Biscuits: Use carrot or celery sticks if you want a healthier twist.
Pro Tip: Always check labels for dog-safe ingredients, especially when using peanut butter.
How to Make Them
Step 1: Mix It Up
In a bowl, stir together the yogurt and peanut butter until smooth. If the peanut butter feels too thick, pop it in the microwave for 10–15 seconds to soften.
Step 2: Fill Your Molds
Spoon the mixture into ice cube trays or silicone molds. Fill them about three-quarters full, leaving a little room for the biscuits.
Step 3: Add the Biscuits
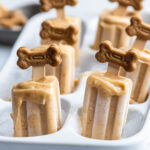
Push one dog biscuit into the center of each mold. The biscuit doubles as a handle, so leave some of it sticking out. If they won’t stay upright, freeze the mixture for 10 minutes first, then try again.
Step 4: Freeze
Stick the trays in the freezer and let them sit for at least 2 hours, or until completely solid. Larger molds may need up to 4 hours.
Step 5: Serve It Up
Pop the frozen treats out of the molds and hand them to your excited pup. The result? Wagging tails and lots of happy licks!
Customization & Tips
Want to get fancy or switch it up? Try these ideas:
- Seasonal Flair: Use pumpkin puree instead of peanut butter in the fall. Add crushed blueberries or strawberries for a summer twist.
- Layered Popsicles: For a fun look, freeze half the mixture first, then add a new flavor layer on top.
- Dietary Needs: For gluten-free treats, use gluten-free dog biscuits. To go vegan, choose coconut yogurt and skip the biscuits.
Pro Tip: Serve these outside or on a washable surface—they can get a bit messy as they melt.
Storage Tips
- Storing Leftovers: Keep extra popsicles in an airtight container or freezer bag to avoid freezer burn. They’re good for up to two months.
- Serving Size: If you have a smaller dog, break the popsicles into halves or quarters before serving.
Final Thoughts
Peanut Butter Dog Popsicles are more than just a snack—they’re a way to show your dog some love, especially when the weather’s blazing hot. They’re quick to make, healthy, and guaranteed to make tails wag. So grab your ingredients, mix up a batch, and watch your pup enjoy their new favorite summer treat. Trust me—they’ll love you for it!
PrintPeanut Butter Dog Popsicles
Treat your furry friend to these easy, homemade Peanut Butter Dog Popsicles! Made with just three simple ingredients—yogurt, peanut butter, and dog biscuits—this frozen delight is perfect for keeping your pup cool and happy on warm days. Quick to prepare and packed with dog-safe flavors, these popsicles are as fun to make as they are for your dog to enjoy!
- Prep Time: 15 minutes
- Cook Time: None
- Total Time: 2 hours 15 minutes (includes Freezing Time)
- Yield: 14 popsicles 1x
- Category: Dog Treats
- Cuisine: Pet-Friendly
Ingredients
- 1 cup plain yogurt (unsweetened and xylitol-free)
- 1 cup creamy peanut butter (natural, no added sugar or salt)
- 14 dog biscuits (size to fit ice cube tray compartments)
Substitutions:
- Yogurt: Use lactose-free or coconut yogurt if your dog is sensitive to dairy.
- Peanut Butter: Pumpkin puree can replace peanut butter for variety.
- Dog Biscuits: Substitute with carrot sticks or celery for a healthier option.
Instructions
- Mix the Ingredients: In a mixing bowl, combine the plain yogurt and peanut butter. Stir until the mixture is smooth and creamy. If the peanut butter is too thick, microwave it for 10–15 seconds to soften.
- Fill the Tray: Spoon the mixture into an ice cube tray or silicone molds, filling each compartment about three-quarters full. This leaves space for the dog biscuits.
- Insert the Biscuits: Push one dog biscuit into the center of each compartment, ensuring it stands upright with part of it sticking out as a handle. If the biscuit doesn’t stay upright, let the mixture freeze for 10 minutes before inserting it.
- Freeze: Place the tray in the freezer and freeze for at least 2 hours or until completely solid.
- Serve: Once frozen, pop the treats out of the tray and serve them to your excited pup!
Notes
Serving Suggestions:
- Serve outside or on an easy-to-clean surface as these treats can get messy when they melt.
Tips & Tricks:
- Always check that peanut butter is free of xylitol, which is toxic to dogs.
- For smaller dogs, break each popsicle into halves or quarters before serving.
Storage & Reheating:
- Store leftover popsicles in an airtight container or freezer bag for up to 2 months to prevent freezer burn.
- No reheating needed—serve straight from the freezer!