

Picture this: creamy, dreamy ice cream meets the crispy crunch of KitKat bars. It’s a match made in dessert heaven! A KitKat Ice Cream Cake is the ultimate no-bake treat. Whether it’s for a birthday, summer party, or just because—this cake will steal the spotlight.
What’s so great about it? The mix of creamy ice cream and crispy wafers. Oh, and the best part? That chocolate shell on top that cracks when you slice it. Don’t worry if you’re not a pro in the kitchen. This recipe is so simple, anyone can nail it. Let’s dive in!

Quick Recipe Details
- Prep Time: 15 minutes (plus freezing overnight)
- Serves: 8-10 slices
- Skill Level: Beginner-friendly!
- You’ll Need:
- A loaf tin (a 2 lb one works great)
- Cling film (aka plastic wrap)
- A silicone spatula
- A sharp knife
Pro Tip: You can make this cake a day ahead. Just let it chill overnight in the freezer, so it’s ready when you need it.
Ingredients
For the Cake:
- 10.2 oz (about 290 g) KitKat bars – These are the star of the show. You can stick to the classic milk chocolate or try flavors like dark chocolate or white chocolate.
- 1 liter vanilla ice cream – Softened for easy layering. Want to mix it up? Try chocolate, mint, or caramel-flavored ice cream.
- 3.5 oz (about 100 g) magic shell chocolate sauce – It hardens into that crackly chocolate shell everyone loves.
Substitutions
- No KitKats? Use Twix, Kinder Bueno, or any wafer-based chocolate.
- Can’t find magic shell sauce? Melt some chocolate with a bit of coconut oil—it works like a charm.
- Have dietary restrictions? Swap in dairy-free ice cream and vegan chocolate.
Ingredient Tips
- Let the ice cream soften, but don’t let it melt. Soft ice cream spreads easily and keeps its shape.
- Use fresh KitKats for the best crunch. Stale ones? Not so great.
Step-by-Step Instructions
1. Prep the Tin
Line your loaf tin with cling film. Make sure to leave some extra hanging over the sides—this makes pulling the cake out a breeze later.
2. Soften Your Ice Cream
Scoop the vanilla ice cream into a bowl and let it sit at room temperature for about 10 minutes. You want it soft but not runny.
3. Layer, Layer, Layer
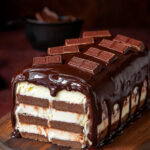
Start with a layer of KitKat bars at the bottom of the tin, placing them face down. This will be the top of your cake once you flip it out. No gaps!
4. Add Ice Cream
Spread half the ice cream over the KitKat layer. Smooth it out with your spatula. Then, add another KitKat layer followed by the rest of the ice cream.
5. Finish Strong
End with a final layer of KitKats. Gently press them down, then fold the cling film over the top to seal it up.
6. Freeze Overnight
Pop the tin into the freezer and let it chill for at least 8 hours. Patience is key here!
7. Unmold & Decorate
When it’s time to serve, lift the cake out of the tin using the cling film. Place it on a serving board or plate. Drizzle magic shell sauce over the top and watch it turn into a glossy chocolate shell in seconds.
8. Slice & Serve
Warm a sharp knife under hot water (then dry it) for easier slicing. Cut into thick pieces and serve right away. Enjoy every bite!
Make It Your Own!
- Diet-Friendly Options: Swap in plant-based ice cream and chocolate for a vegan dessert.
- Flavor Switch-Up: Try strawberry, cookies-and-cream, or coffee-flavored ice cream for a fun twist.
- Festive Add-Ons: Crushed peppermint candy for Christmas? Yes, please. Or sprinkle pastel colors for Easter.
- Fancy Layers: Add some caramel or Nutella between the ice cream layers for extra indulgence.
How to Serve & Store
- Serving Ideas: Serve the cake just as it is. Want to go all out? Pair it with fresh berries or a dollop of whipped cream. For a cozy vibe, serve it with hot coffee or espresso.
- Storing Leftovers: Wrap any leftover cake tightly in plastic wrap and keep it in an airtight container in the freezer. It’ll stay good for up to two weeks.
- Slicing Tip: Let the cake sit for 5 minutes before slicing. This makes cutting easier without ruining its shape.
This KitKat Ice Cream Cake is more than just a dessert—it’s a fun, delicious way to celebrate any occasion. Simple to make, stunning to serve, and impossible to resist. So what are you waiting for? Go grab some KitKats and get started!
PrintKitKat Ice Cream Cake
This KitKat Ice Cream Cake is a no-bake, indulgent treat that combines creamy vanilla ice cream, crunchy KitKat bars, and a glossy magic shell chocolate topping. Perfect for celebrations or as a fun dessert, it’s easy to make and guaranteed to impress!
- Prep Time: 15 minutes
- Cook Time: None (freezing time: overnight)
- Total Time: 8 hours 15 minutes
- Yield: 8–10 slices 1x
- Category: Dessert
- Cuisine: American
Ingredients
- 290 g (10.2 oz) KitKat bars (approximately 3 packs; adjust based on container size)
- 1 liter vanilla ice cream, softened for 10 minutes
- 100 g (3.5 oz) magic shell chocolate sauce
Instructions
Prepare the Tin: Double-line a 2 lb (900 ml) nonstick loaf tin with cling film, leaving enough overhang on all sides for easy removal later.
Soften the Ice Cream: Scoop the vanilla ice cream into a bowl and let it sit at room temperature for about 10 minutes until pliable but not melted.
Layer the KitKats and Ice Cream:
- Arrange a layer of KitKat bars along the bottom of the tin, face down (this will be the top when unmolded).
- Spread half the softened ice cream evenly over the KitKat layer using a silicone spatula.
- Add another layer of KitKat bars on top of the ice cream.
- Spread the remaining ice cream evenly over this second KitKat layer.
- Finish with a final layer of KitKat bars on top.
Freeze: Cover the cake with the overhanging cling film and freeze overnight until solid (at least 8 hours).
Unmold and Decorate: The next day, carefully lift the cake out using the cling film overhangs and place it on a serving board or platter. Drizzle magic shell chocolate sauce over the top and let it set for 2–3 minutes.
Serve: Slice with a sharp knife warmed under hot water (wipe dry before cutting) and serve immediately.
Notes
Serving Suggestions:
- Serve as-is or pair with fresh berries, whipped cream, or coffee to balance its sweetness.
Tips & Tricks:
- Ice Cream Texture: Ensure ice cream is soft enough to spread but not melted to maintain structure.
- KitKat Arrangement: Arrange bars snugly to create a sturdy base and layers.
- Knife Tip: Warm your knife under hot water before slicing for clean cuts.
Storage & Reheating:
- Store leftovers tightly wrapped in plastic wrap in the freezer for up to 2 weeks.
- Let slices sit at room temperature for about 5 minutes before serving to soften slightly.