

What happens when you combine two dessert favorites—Southern banana pudding and classic ice cream? You get banana pudding ice cream, a treat that feels like a big, sweet hug! Banana pudding first showed up in Southern kitchens in the late 1800s, with its comforting layers of sliced bananas, custard, and vanilla wafers. Over the years, it got even easier to make, thanks to quick fixes like instant pudding and Nilla wafers.
This recipe? It takes that nostalgic flavor and gives it a refreshing, frozen twist. It’s the perfect dessert for summer afternoons or whenever you want a little taste of home. And the best part? It’s simple enough for beginners but tasty enough to wow a crowd.

The Basics
Here’s what you need to know before diving in:
- Time Required: About 4 hours and 35 minutes (most of that is chilling and freezing time).
- Servings: Makes 4 portions, but you can double or triple it for parties.
- Difficulty: Easy—no stress here.
- What You’ll Need:
- Medium saucepan
- Airtight container
- Ice cream maker (or a simple no-churn alternative)
- Whisk
Bonus: You can prep this ahead of time—it keeps well in the freezer for two weeks. Perfect for planning ahead or surprising guests!
Ingredients
The Essentials
- 2 cups heavy cream
- 2½ cups whole milk
- ½ cup sugar
- 1 (3.4-ounce) package of instant banana pudding mix
- 1 large ripe banana, cut into small chunks
- ½ cup crushed Nilla wafers (plus extra for topping, if you’d like)
Swaps & Tweaks
- No Heavy Cream? Use half-and-half for a lighter version.
- Dairy-Free? Try coconut cream and almond or oat milk.
- Out of Nilla Wafers? Any cookie with a hint of vanilla will do.
- No Banana Pudding Mix? Swap it for vanilla pudding and mix in a mashed banana for extra flavor.
Pro Tip: Use ripe bananas with brown spots—they’re sweeter and creamier. And stick to instant pudding (not the cook-and-serve kind). Trust me, it makes a difference.
How to Make It
Making banana pudding ice cream is easier than you think. Let’s break it down step by step:
Step 1: Prep the Base
- In a medium saucepan, heat the heavy cream and milk over medium-low heat. Don’t let it boil—you just want a gentle simmer.
- Remove from the heat and whisk in the sugar until it’s fully dissolved. Tip: Rub a little of the mixture between your fingers—it should feel smooth.
- Pour this mixture into an airtight container and pop it in the fridge to chill for at least 4 hours. The cooler it gets, the creamier your final ice cream will be.
Step 2: Mix the Ice Cream
- After the base is nice and cold, stir in the instant banana pudding mix. Whisk well until there are no lumps, and watch as the mixture thickens slightly.
- Pour it into your ice cream maker and churn according to the manufacturer’s instructions. No ice cream maker? No problem. Pour it into a loaf pan and stir every hour as it freezes—it works like a charm.
Step 3: Add the Good Stuff
- During the last few minutes of churning (or after 3 hours if you’re doing no-churn), gently fold in the banana chunks and crushed Nilla wafers. These mix-ins bring texture and bursts of flavor to every bite.
Step 4: Freeze & Serve
Freeze it for 2 more hours until it’s firm. When you’re ready to serve, let it sit on the counter for 5–10 minutes to soften up.
Scoop the ice cream into a freezer-safe container and smooth the top. Feeling fancy? Sprinkle on some extra crushed wafers.
Make It Your Own
This recipe is super flexible. Want to get creative? Here are a few ideas:
Dietary Adjustments
- Dairy-Free: Use coconut cream with almond milk, and pick a vegan pudding mix.
- Gluten-Free: Swap in gluten-free vanilla wafers—or skip them entirely.
Flavor Boosts
- Add a pinch of cinnamon or nutmeg to the ice cream base. Feels cozy, right?
- Swirl caramel or chocolate sauce into the ice cream before freezing. Dessert just got next-level.
Seasonal Spins
In the summer, toss in a handful of fresh strawberries or blueberries for a fruity twist.
Serving & Storing
How to Serve It:
- Scoop it into bowls and top with extra Nilla wafers.
- Drizzle caramel sauce on top for a little extra indulgence.
- Feeling fancy? Add whipped cream or a sprinkle of crushed meringue for a traditional banana pudding vibe.
Storing Leftovers:
Store your ice cream in an airtight container in the freezer for up to two weeks. To keep it extra fresh, press some plastic wrap directly against the surface before sealing the lid.
Quick Thaw Tip:
If the ice cream gets too hard, let it sit at room temp for 10 minutes before scooping. No need to wrestle with your dessert!
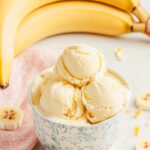
Banana pudding ice cream is more than a dessert. It’s a bite of nostalgia, a cool treat for sunny days, and a recipe you’ll want to make again and again. Whether you’re sharing it with friends or sneaking a bowl after dinner, this dish is a winner every time!
Enjoy every creamy, crunchy bite.
PrintBanana Pudding Ice Cream
This Banana Pudding Ice Cream is a creamy, nostalgic twist on the classic Southern dessert. Infused with ripe bananas, crunchy Nilla wafers, and the smoothness of banana pudding, it’s the perfect frozen treat to cool off on a warm day or bring a bit of sunshine to any season.
- Prep Time: 4 hours 30 minutes
- Cook Time: 5 minutes
- Total Time: 4 hours 35 minutes
- Yield: 4 1x
- Category: Dessert
- Cuisine: American
Ingredients
- 2 cups heavy cream
- 2 ½ cups whole milk
- ½ cup granulated sugar
- 3.4 oz package instant banana pudding mix
- 1 large ripe banana, cut into ½-inch coins and quartered
- ½ cup crushed Nilla wafers (plus extra for topping, optional)
Substitutions:
- Use half-and-half instead of heavy cream for a lighter version.
- Swap whole milk with almond or oat milk for a dairy-free option.
- Gluten-free vanilla wafers can replace Nilla wafers for gluten-sensitive diets.
Instructions
- Prepare the Base: In a medium saucepan, heat heavy cream and whole milk over medium-low heat until it just begins to simmer (do not boil). Remove from heat and whisk in granulated sugar until fully dissolved. The mixture should feel smooth when rubbed between your fingers.
- Chill the Mixture: Pour the mixture into an airtight container and refrigerate for at least 4 hours until completely chilled. This step ensures the pudding mix incorporates evenly later.
- Mix in Pudding: Once chilled, stir in the instant banana pudding mix. Whisk vigorously to avoid lumps; the mixture will thicken slightly as the pudding activates.
- Churn the Ice Cream: Pour the base into your ice cream maker and churn according to the manufacturer’s instructions. Alternatively, for a no-churn method, pour into a loaf pan and freeze, stirring every hour for about 3 hours to break up ice crystals.
- Add Mix-ins: During the last 3 minutes of churning (or after 3 hours in no-churn), gently fold in banana chunks and crushed Nilla wafers to distribute them evenly without breaking them apart too much.
- Freeze & Serve: Transfer the ice cream to a freezer-safe container, smooth out the top with a spatula, and sprinkle additional crushed wafers if desired. Freeze until firm (about 2 more hours). Let it sit at room temperature for 5–10 minutes before scooping for best texture.
Notes
Serving Suggestions:
Serve scoops in bowls or waffle cones topped with extra crushed Nilla wafers or a drizzle of caramel sauce for added indulgence.
Tips & Tricks:
- Use ripe bananas with brown spots for maximum sweetness and flavor.
- Avoid overmixing when adding wafers to maintain their crunchiness.
Storage & Reheating:
Store in an airtight container in the freezer for up to two weeks. To prevent freezer burn, press plastic wrap directly onto the surface before sealing. If frozen too hard, let it thaw at room temperature for about 10 minutes before serving.