

Is there anything better than a slice of Dairy Queen Ice Cream Cake? I mean, come on—those creamy layers of chocolate and vanilla ice cream, the iconic cookie crunch, and the rich fudge center? Pure bliss. It’s the kind of dessert that screams celebration, whether it’s a birthday, an anniversary, or just a random Wednesday night treat for yourself.
Fun fact: the idea of mixing ice cream with cake textures has been around since the Renaissance! But Dairy Queen nailed their version back in the mid-1900s. Inspired by this classic treat, I’ve put together a super simple recipe you can whip up at home. Ready to bring some DQ magic to your kitchen? Let’s get started.

Quick Recipe Snapshot
Here’s a quick rundown of what to expect:
- Prep Time: About 45 minutes of hands-on work. Total time? Around 6 hours (freezing’s the key!).
- Servings: This recipe is made for a crowd—12 to 14 servings. You can easily halve it if you’re working with a smaller group.
- Difficulty: Moderate. It’s not hard, but you’ll need some patience for the layers to freeze properly.
- Tools You’ll Need:
- 9-inch springform pan (or any cake pan lined with plastic wrap)
- Offset or silicone spatula
- Mixer (hand or stand, your choice)
- Mixing bowls (metal works best for whipping cream)
- Optional: Piping bag if you want to get fancy with decorations
What You’ll Need
For the Ice Cream Layers:
- 1 quart chocolate ice cream (softened just enough to spread)
- 1 quart vanilla ice cream (same deal—soft but not melted)
For the Cookie Crunch:
- 20 chocolate sandwich cookies (Oreos work perfectly), crushed
- 4 tablespoons salted butter, melted
For the Fudge Layer:
- 1 jar (11.75 oz) of hot fudge topping
For the Frosting:
- 2 cups cold heavy whipping cream
- 1¼ cups powdered sugar
- 1½ teaspoons clear vanilla extract
Optional Toppings:
- Sprinkles or chocolate shavings
Substitution Ideas:
- No Oreos? Try graham crackers or chocolate chip cookies.
- Going dairy-free? Use vegan ice cream and whipped coconut cream.
Step-by-Step: Let’s Build This Beauty

Step 1: Prep the Basics
Line your springform pan with plastic wrap. Trust me, this will make your life easier later. Crush your cookies, mix them with melted butter, and spread them on a baking sheet lined with parchment paper. Bake at 350°F for about 7–8 minutes (this keeps the crumbs crunchy). Let them cool completely.
Pro Tip: Skipping this baking step can make the cookie crumbs soggy when you layer them with ice cream. Don’t skip it!
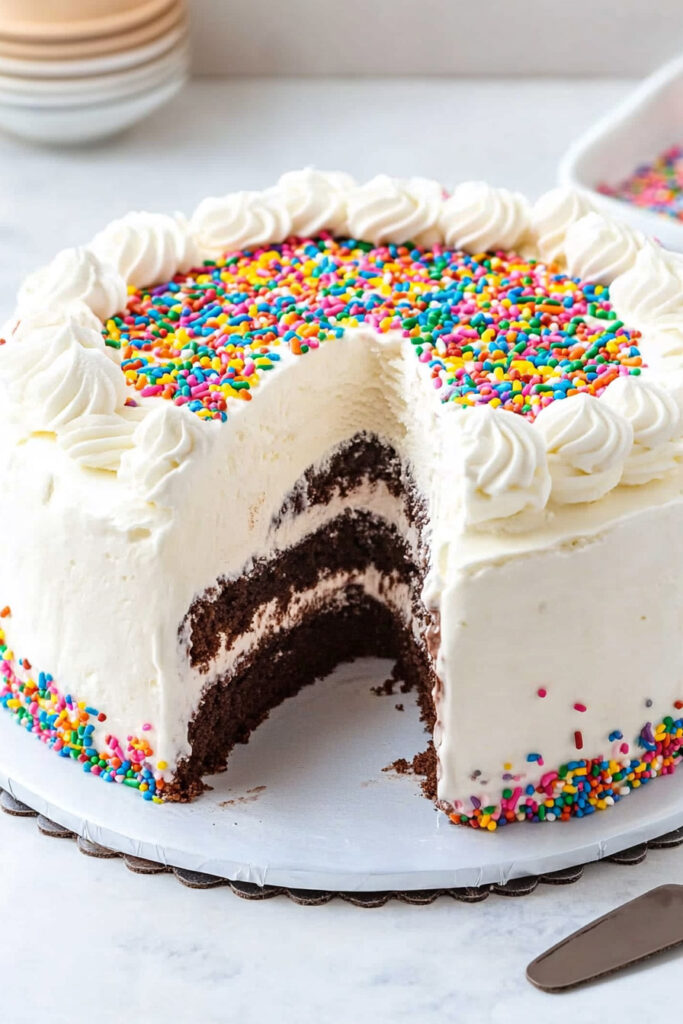
Step 2: Chocolate Ice Cream Layer
Take the chocolate ice cream out of the freezer and let it sit for 15–20 minutes—just enough to make it spreadable. Scoop it into your pan and smooth it out evenly with a spatula. Pop it in the freezer for at least 30 minutes.
How to Tell It’s Ready? The layer should be firm and smooth with no air bubbles.
Step 3: Fudge Meets Crunch
Warm up your hot fudge topping in the microwave for about 20 seconds, then spread it over the frozen chocolate layer. Sprinkle the cooled cookie crumbs on top, pressing them in gently so they stick. Freeze again for at least an hour.
Important: Don’t rush this step—freezing in between layers keeps everything neat and tidy.
Step 4: Vanilla Ice Cream Time
Follow the same softening process as you did with the chocolate ice cream. Spread it evenly over the cookie layer. Stick the whole thing back in the freezer for 4–6 hours, or overnight if possible.
How to Check: The top should feel firm to the touch.
Step 5: Whip, Frost, Decorate
Chill your mixing bowl (and beaters) in the freezer for 30 minutes. Then whip your heavy cream, powdered sugar, and clear vanilla extract on medium speed, gradually increasing to high until stiff peaks form (takes about 3–4 minutes).
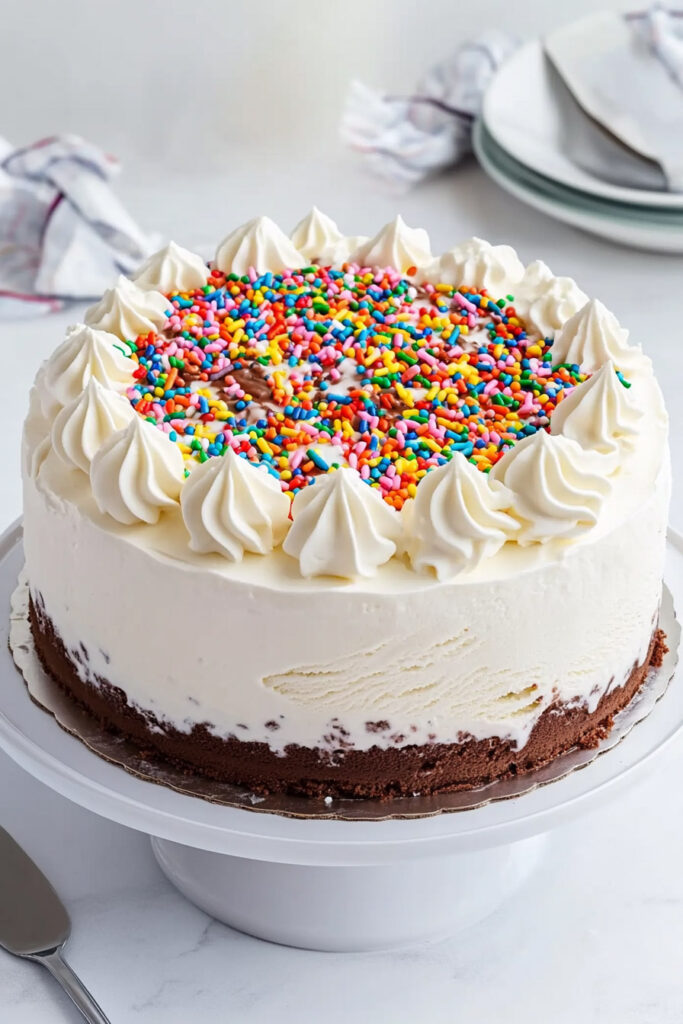
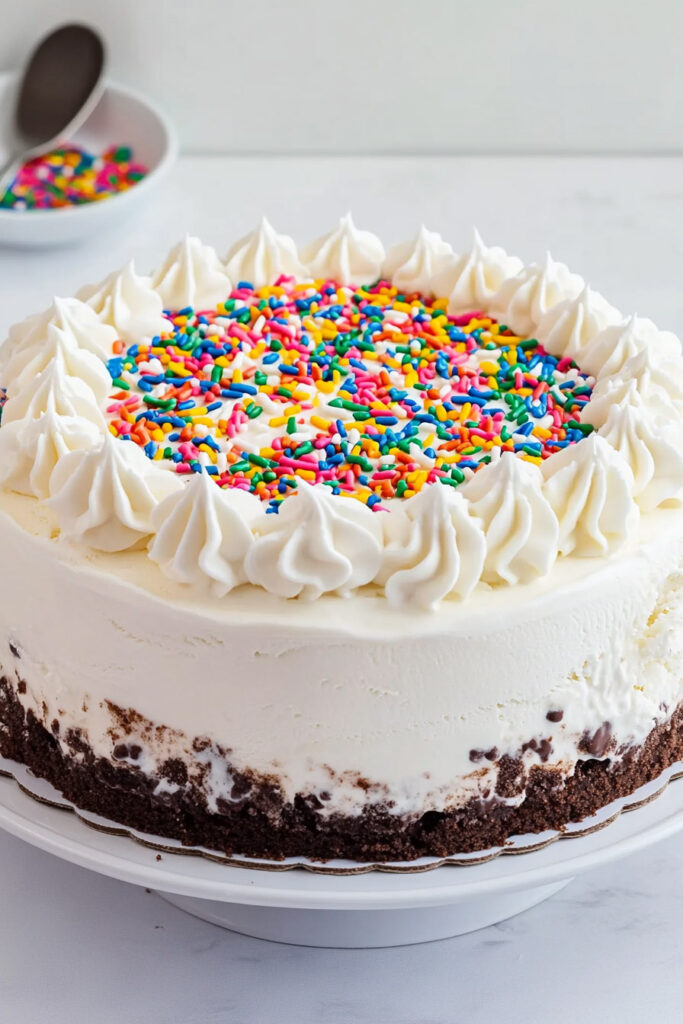
Frost the top and sides of the cake, working quickly to avoid melting. If you’re feeling fancy, pipe borders with a star tip or sprinkle on some fun toppings.
Pro Tip: Keep your frosting tools cool to make decorating easier.
Customize It Your Way
- Vegan or Gluten-Free? Use plant-based ice creams, coconut whipped cream, and gluten-free cookies.
- Switch Up the Flavors: Try mint chocolate chip, peanut butter swirl, or even coffee ice cream.
- Seasonal Flair: Sprinkle crushed peppermint candies for the holidays or add fresh berries in the summer.
Serving & Storing
Serving: Let the cake sit at room temp for about 10 minutes before slicing. For clean cuts, dip your knife in hot water between slices.
Storage: Wrap leftover slices individually in plastic wrap, then store them in an airtight container in the freezer. They’ll stay good for about a week.
The Result?
A homemade version of that classic Dairy Queen Ice Cream Cake you know and love. It’s 100% customizable, super fun to make, and guaranteed to bring smiles all around. What’s not to love?
Copycat Dairy Queen Ice Cream Cake

This homemade Copycat Dairy Queen Ice Cream Cake is a celebration in every bite! With creamy layers of chocolate and vanilla ice cream, a crunchy cookie crumble, and rich hot fudge, it’s the ultimate dessert for birthdays, holidays, or any special occasion. Easy to customize and perfect for make-ahead prep, this cake will bring smiles to your table.
- Prep Time: 45 minutes
- Cook Time: 8 minutes
- Total Time: ~6 hours (including freezing time)
- Yield: 12–14 1x
- Category: Dessert
- Cuisine: American
Ingredients
Ice Cream Layers:
- 1 quart chocolate ice cream (softened)
- 1 quart vanilla ice cream (softened; vanilla bean recommended)
Cookie Crunch Layer:
- 20 chocolate sandwich cookies (crushed, with cream center)
- 4 tablespoons salted butter (melted)
Hot Fudge Layer:
- One 11.75-ounce jar hot fudge topping
Whipped Cream Frosting:
- 2 cups cold heavy whipping cream
- 1¼ cups powdered sugar
- 1½ teaspoons clear vanilla flavoring
Optional Garnish:
- Colorful sprinkles or chocolate shavings
Substitution Notes: For a dairy-free version, use vegan ice creams and coconut whipped cream. Gluten-free cookies work well for those avoiding gluten.
Instructions
- Prepare the Pan and Cookie Crumbs: Line a 9-inch springform pan with plastic wrap for easy removal. Preheat your oven to 350°F (175°C). Mix crushed cookies with melted butter in a bowl, spread evenly on a parchment-lined baking sheet, and bake for 7–8 minutes until crisp. Let cool completely.
- Chocolate Ice Cream Layer: Soften chocolate ice cream at room temperature for about 15–20 minutes. Spread evenly into the bottom of the prepared pan using an offset spatula. Freeze for at least 30 minutes until firm.
- Hot Fudge and Cookie Crunch Layers: Microwave hot fudge topping for about 20 seconds to make it spreadable. Spread over the frozen chocolate ice cream layer with a spatula. Sprinkle cooled cookie crumbs evenly on top, pressing gently to adhere. Freeze for another hour.
- Vanilla Ice Cream Layer: Soften vanilla ice cream as before and spread it evenly over the cookie crunch layer. Freeze the entire cake for at least 4–6 hours or overnight for best results.
- Whipped Cream Frosting: Chill your mixing bowl in the freezer for 30 minutes before whipping cream. Beat heavy whipping cream, powdered sugar, and clear vanilla flavoring on medium speed until combined, then on high speed until stiff peaks form (about 3–4 minutes).
- Frost and Decorate: Remove the cake from the springform pan and peel off the plastic wrap carefully. Frost the sides and top quickly with whipped cream using an offset spatula. Pipe decorative borders with a star tip if desired and sprinkle with colorful sprinkles or chocolate shavings. Return to the freezer until ready to serve.
Notes
Serving Suggestions:
Let the cake sit at room temperature for about 10–15 minutes before slicing to make cutting easier. Use a knife dipped in hot water for clean slices.
Tips & Tricks:
- Work quickly while assembling layers to prevent melting.
- Bake cookie crumbs to keep them crunchy between layers.
- Chill tools like spatulas and bowls to maintain frosting consistency.
Storage & Reheating:
Store leftover cake in an airtight container in the freezer for up to one week. Wrap individual slices in plastic wrap before freezing to prevent freezer burn. This dessert doesn’t reheat but can be enjoyed slightly thawed straight from the freezer!