Mocha Ice Cream Cake
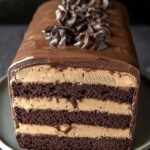
This mocha ice cream cake is a rich and indulgent treat featuring layers of moist dark chocolate cake, creamy homemade coffee ice cream, and a silky chocolate ganache. Perfect for special occasions or when you want to impress, this dessert combines the best of cake and ice cream into one show-stopping creation.
- Prep Time: 1 hour 30 minutes
- Cook Time: 15–18 minutes
- Total Time: ~10 hours (includes chilling/freezing time)
- Yield: 8–10 1x
- Category: Dessert
- Cuisine: American
Ingredients
Scale
Dark Chocolate Cake
- 2 cups all-purpose flour
- 2 cups granulated sugar
- ½ cup oil (vegetable or canola)
- ½ cup unsalted butter
- 1 cup water
- 4 tablespoons cocoa powder (Hershey’s Special Dark recommended)
- ½ cup buttermilk (room temperature)
- 1 teaspoon baking soda
- 1 teaspoon vanilla extract
- 1 teaspoon Kosher salt
- 2 large eggs (room temperature)
Coffee Ice Cream
- 2 cups half-and-half
- 2 cups heavy cream (divided)
- ¾ cup granulated sugar
- 3 tablespoons espresso powder (adjust to taste)
- ¼ teaspoon Kosher salt
- 2 large egg yolks (room temperature)
- 1 teaspoon vanilla extract
Chocolate Ganache
- 10 ounces bittersweet chocolate morsels (60% cocoa recommended)
- 1 cup heavy cream (or half-and-half for a lighter ganache)
Instructions
1. Bake the Chocolate Cake
- Preheat your oven to 400°F. Grease a half-sheet pan with cooking spray and line it with parchment paper.
- In a mixing bowl, sift together flour and sugar. Set aside.
- In a saucepan, combine oil, butter, water, and cocoa powder. Heat until it just begins to boil, then pour over the dry ingredients and mix until smooth. Add buttermilk, baking soda, salt, vanilla extract, and eggs; stir until fully combined.
- Pour the batter into the prepared pan and bake for 15–18 minutes or until a toothpick inserted in the center comes out clean. Let cool completely before cutting into three pieces (~4″x8″). Freeze the pieces until firm.
2. Make Coffee Ice Cream
- In a saucepan over medium heat, combine half-and-half, heavy cream (1½ cups), sugar, espresso powder, and salt. Stir until sugar dissolves.
- In a separate bowl, whisk egg yolks with the remaining heavy cream. Slowly temper the yolks by adding hot cream mixture while whisking constantly to prevent curdling. Return everything to the saucepan and cook over medium-low heat until slightly thickened (it should coat the back of a spoon). Do not boil.
- Strain through a fine-mesh sieve into a bowl and stir in vanilla extract. Cover with plastic wrap touching the surface and refrigerate until chilled. Once cold, churn in an ice cream maker (~45 minutes). Freeze until firm but spreadable (~1–2 hours).
3. Assemble the Cake
- Line a loaf pan (4″x8″) with plastic wrap for easy removal later. Place one layer of frozen cake at the bottom of the pan, spread coffee ice cream evenly (~¾–1 inch thick), cover with plastic wrap, and freeze until firm (~1 hour).
- Add another layer of cake and ice cream, repeating the process before topping with the final piece of cake. Freeze until completely firm.
4. Prepare Ganache & Finish
- Heat heavy cream in a saucepan until hot but not boiling; pour over chocolate morsels in a heatproof bowl. Let sit for one minute before stirring until smooth and glossy. Cool ganache until thickened but still pourable (~1 hour).
- Place your assembled cake on a cooling rack set over a sheet pan. Pour ganache evenly over the top, letting it drip down naturally to coat all sides. Freeze briefly to set ganache.
Notes
Serving Suggestions:
Slice slightly thawed for easier cutting—about 5–10 minutes out of the freezer is ideal! Serve with whipped cream or fresh berries for added elegance.
Tips & Tricks:
- Tempering eggs slowly prevents curdling during ice cream preparation.
- For clean layers during assembly, ensure both cake and ice cream are firm before layering.
- Use decaf espresso powder if you want to avoid caffeine.
Storage & Reheating:
Wrap leftover slices tightly in plastic wrap and store in the freezer for up to five days. This dessert is best served straight from the freezer—no reheating needed!
Find it online: https://icecreamin.com/mocha-ice-cream-cake/